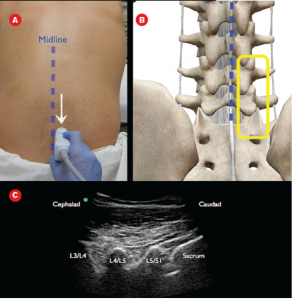
Integration of ultrasound when determining ideal needle entry in a difficult case can prevent repeated failed attempts and the overreliance on consultative services.
Explore This Issue
ACEP Now: Vol 33 – No 07 – July 2014
Ultrasound guidance is an accepted practice for many emergency medicine procedures (eg, central venous cannulation, joint aspiration, pericardiocentesis), but it is not commonly associated with benefit in lumbar punctures.1-3 Patients with nonpalpable bony landmarks and/or failed attempts can benefit from anatomical localization with ultrasound. Integration of ultrasound when determining ideal needle entry in a difficult case can prevent repeated failed attempts and the overreliance on consultative services (eg, interventional radiology or anesthesiology). A simplified two-step approach—defining the correct lumbar level and the true anatomic midline—can make this often-difficult “blind” procedure controlled and precise.
Patient Positioning
We recommend placing the patient in a sitting position, with feet supported and moderate neck flexion. The goal is to enlarge the interspinous distance; however, positioning should be determined by patient tolerance and comfort. The lateral decubitus position is also amenable to bony localization with ultrasound.
Probe Selection
The curvilinear low-frequency (5–2 MHz) transducer is ideal for imaging nonpalpable bony landmarks in the difficult adult patient. In our opinion, the linear high-frequency transducer (commonly recommended for ultrasound landmark identification) is limited in only identifying structures under 6–9 cm in depth and not ideal in a patient with a large body habitus.
Bony Landmark Identification with Ultrasound4
Set the ultrasound system to a depth of around 10–12 cm with presets for musculoskeletal imaging (the depth will have to be adjusted based on the patient). Position the curvilinear low-frequency transducer with probe marker cephalad near the presumed midline. Slowly slide the transducer in a lateral manner (left or right) until the facet joints are noted. A paramedian view will be obtained, allowing for imaging of the inferior and superior articular processes of the adjacent lumbar vertebrae. These facet joints will look like humps on the ultrasound screen (see Figure 1). Then slide the probe caudad until the sacrum is visualized (horizontal hyperechoic line; see Figure 2). Delineating the most inferior aspect of the lumbar spine will allow for accurate localization of the L3-L4 and L4-L5 interspaces.
Pages: 1 2 3 | Single Page


No Responses to “How to Perform an Ultrasound-Assisted Lumbar Puncture”