Technique
1. Prepare the patient for a standard paracentesis, and place the patient on a monitor.
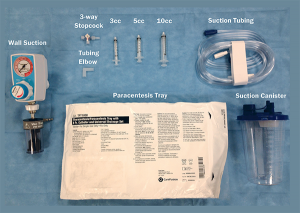
2. Ensure that wall suction is available, and attach standard tubing to the wall, with the opposite end connected to the first suction canister.
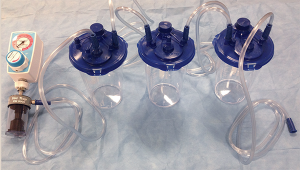
3. Another piece of tubing is then used to attach the first canister to a second canister.
4. It is important to note that most canisters have one port with a self-sealing filter (see
Figure 2). Using this port will close the system and prevent continuous flow, so it is necessary to avoid this port, except for first canister connected to the wall.
5. Once all of the tubing is connected, ensure that all other ports are capped and sealed.
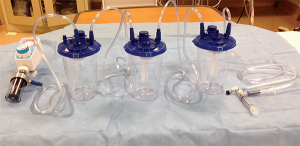
6. This process for adding canisters can be repeated several times, depending on the amount of fluid to be drained. This will effectively create a suction “train,” as shown in Figure 3.
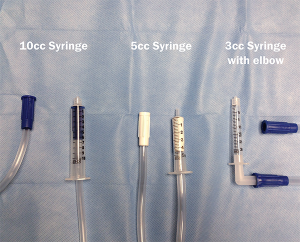
7. After you have the desired number of canisters in your “train,” take the final end of suction tubing and place it tightly into a syringe (you must first remove the plunger). Based on the size of suction tubing used and syringes at your hospital, this setup may vary, as shown in Figure 4.
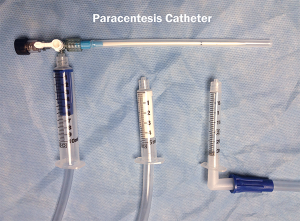
8. After successful insertion of the catheter into the peritoneal cavity, the suction syringe can be attached directly to the paracentesis catheter or first to a 3-way stopcock, as explained below in Step 10 (see Figure 5).
9. Turn the paracentesis catheter valve to the open position, and turn on the wall suction. The fluid will begin to drain into the first canister of the “train.” After filling the first canister to capacity, the fluid will continue to drain into the adjacent canister(s) without any intervention.
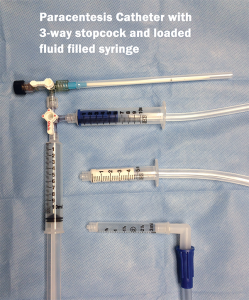
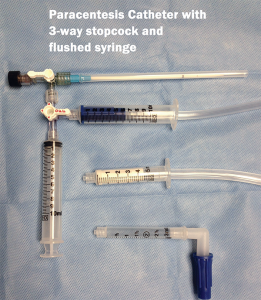
10. If you find that the flow stops, presumably from siphoning a loop of bowel to the catheter tip, you can integrate a 3-way stopcock with a syringe into the system (Figure 6A). This will allow you to flush the catheter with sterile saline or, preferably, the patient’s own ascitic fluid in order to push any bowel wall away from the catheter tip. If the flow stops, turn the 3-way stopcock to the off position to the suction syringe. Place the valve to the open position to a 10 ml or 50 ml syringe filled with the patient’s ascitic fluid; then flush 5–10 ml at a time through the catheter in an attempt to restore flow to the suction tip (Figure 6B). Ultrasound may also be used to determine the location of the catheter tip while flushing the fluid. Return the valve to the open position to the suction syringe, and resume the removal of ascitic fluid once flow is restored.
Pages: 1 2 3 | Single Page




3 Responses to “How To Use Continuous Wall Suction for Paracentesis”
October 22, 2015
tylerTried this using the red cardinal suction canisters, which have liners. Could not get it to work. The liner gets sorta sucked up in the distal (patient) canister, and fluid kinda flows through it into the proximal (wall) canister, which fills up and cuts off suction at the valve. Is this brand dependent?
October 23, 2015
Jordan JeongHey Tyler, I think I’m following what you are describing but I do not believe it is brand dependent as we use the blue cardinal suction canisters. However we don’t have/use soft liners. This may be causing your issue. Although as long as the tubes are hooked up to the correct ports it should work. I’d like to help you get this working though. I use it all the time and it makes life much easier for me at least.
March 10, 2019
Angel FarroHello, I am a emergency medicine physician from Perú, and my question is about the proped pressure of the suction that you recommend, and the time when a volume of 5 liters can be extracted. Thank you.